Friday, August 28, 2009

Basket Weave

This past Tuesday's cake decorating class contained the one thing I really, really, really wanted to learn; making the faux basket look.


I brought in a homemade cake, with homemade icing. The teacher explained it but when he was done, I was still totally lost. He left the class room to go get some tool he was talking about, and a classmate scooted over next to me. She had done the basket weave in another, discontinued course, and showed me how to do it. Once you get the hang of it, it's easy!


Ignore the cut in the cake on top. I grabbed a tool, and ran it across. And the bottom? Just me trying to get rid of the rest of the icing in the bag. Just look at the basket pattern. I really like it!

Also, click the pics to make them larger. That top icing looks pretty darned smooth this time, don't you think? I'm slowly getting the hang of it. :)

Sunday, August 23, 2009

Tiffany Box Practice Cake

My youngest sister, Lissette, came to visit tonight, Sunday, and Monday. We decided to practice a "Tiffany Box" cake for our other sister, Vicky. Vicky's throwing a bridal shower and asked both of us if we could make the cake. Lissette is also a cake decorator. She has a blog but is (her words) lazy about updating it.

Before she arrived, I worked on the gum paste bow for the box, cutting the bow pieces out and dusting them with platinum dust.


The ring below was made with gum paste and a fake "rock" off a barrette I bought for $4 at Michael's. I also dusted it with platinum dust, but I am not sure you can see it well in this picture.


Before she arrived this afternoon, I baked four thin 8" square cakes. We used 3. The fourth I'll use for cake class on Tuesday. I also made icing.


This evening after dinner and putting the kids to bed, we got to work. We iced the cakes and put them in the fridge so the icing would harden.


We spread out the marshmallow fondant (she'd still been using Wilton brand!! OMG - gross. She was SO impressed with the MMF, she's going to make some herself next time around).


We started putting things together. I wanted an entire piece of fondant over the cake, she wanted squares. We went with the squares. This made it a little difficult with the edges. We ended up coloring some icing the same color as the fondant to sort-of hide the edges. I think it worked really well for a practice run.

The bride-to-be's name is Nikki, so the name on the box reflects that.

Here are my sister and I. I joked on FB that we would call our cake company "924 Cakes." (Nine Twenty Four Cakes). Why? She and I were both born on September 24, 16 years apart.

Saturday, August 22, 2009

Getting ready...

to make a practice run at a cake my sister requested. So, be on the lookout for something cool (I HOPE!)


Friday, August 7, 2009

Wonky Cake Attempt

Also known as the Topsy-Turvy cake, a Wonky Cake is a cake that just defies gravity. It looks like it is about to topple over. There are several tricks to this cake style, the first being...the cakes have to be tall!


I set out to make two of each sized pan cake I was going to attempt. (Hence the chocolate cake that I overfilled. I was going for height and failed).


There was a lot of baking going on. I so wish I had a second oven and duplicates of the pans I own. I spent several several hours making cakes, baking, cleaning, cooling, to start all over again with more pans.


Six cakes later (2 ea. of 6", 8" and 10" sizes), I called it a night.


The following evening was time to make the MMF (crazy mess), Peanut Butter Butter cream icing, Oreo Cookie Cream Cheese icing and some regular butter cream icing.


Peanut butter icing. YUM!!!
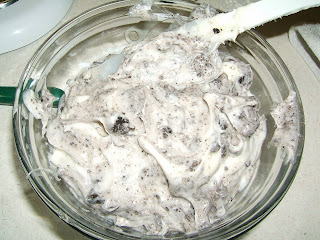


Cream cheese icing with Oreo cookies mixed in it. Heaven.


NOW comes the fun part. Fun as in hard really. LOL One cake is split right down the middle and iced. The second cake is split at an angle, then flipped around on itself, creating a really steep hill. This is all iced and put on top of the straight cut cake.


The cakes are then iced all over and put in the fridge to let the icing harden.


Starting with the largest layer, I traced and cut out a circle the size of the cake that will go on top of the biggest one. The largest being a 10" cake, I cut an 8" circle out of wax paper and used it as a template to cut an 8" circle into the 10" cake. This circle is then carved out of the 10" cake, making a level area for me to put the next cake into.


See, it's all an illusion. Although it looks like the cakes are tipping, they are actually sitting level. Tricky, huh?


This cake above is then covered in fondant and wood dowels are cut and placed in the center to give the support to the next cake going above.


(fondant was too sticky/mushy)


The same exact thing is done with the 8" cake. I cut a 6" circle, and scoop out the cake, ice it again, cover it with fondant, and then place the 8" cake on top of the 10" one. This picture below shows the 8" cake "inside" the 10" one, while the 6" one is being covered to be put on top of the 8" one.
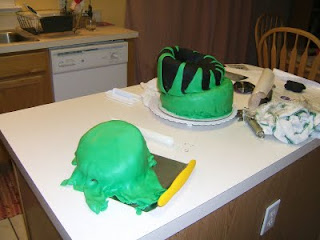


After placing them all together, I decorated the cakes using fondant and colored icing.
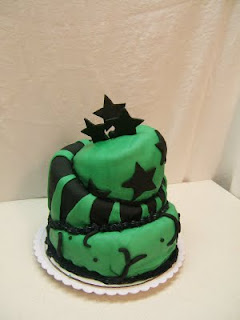
So here's the final product. It's not pretty but not bad. My first attempt at this. The fondant was too soft (MMF). I think if I attempt this again, I'll use the professional grade (NOT Wilton) stuff.

Note: The stars on top are actually supposed to be suspended by wires. I should have made very very thin out of gum paste a few days ago, so they could dry. The fondant was too heavy and the wire was to thin to hold the stars up.

Here are some stars made of construction paper, so you can see what I meant to make with the stars.
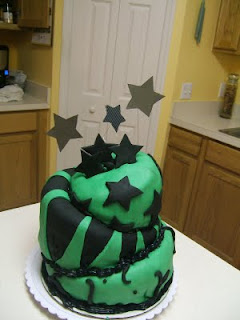
Cake fall down, go boom!


I decided to make a chocolate cake. I went with a recipe from the 500 Cakes book I bought a few months back. All was going well.


Isabel insisted I be "Tasha" of the Backyardigans. She colored the mask herself.

I filled the pan with batter and put it in the oven. About 35 minutes later, I smell burning from the oven. The cake was overflowing over the sides and batter had fallen on the hot elements. Great. I overfilled the pan and now I have to clean the oven.

After over an hour, I opened the oven and this happened.


Foom! Implosion. I have never ever had that happen. Weird. I heard people talk about it in cake class, but this was a first. I guess since I overfilled the pan, the center was just not getting cooked. What a waste.