Wednesday, October 28, 2009

Hello Kitty Quick Cake

Isabel loves Hello Kitty. She also adores Nightmare Before Christmas, but that's another post.


She has been bugging me for a Hello Kitty cake for some time. So, one night watching TV, I decided to break out the gum paste, gel color and assorted tools, and sculpt a Hello Kitty figure and some flowers.

Click the pics to see them bigger.


I made a box cake and used canned icing. WOW, do I dislike canned icing with a passion! I just used it because this was a quick thing for us here at home, but man, after making my own, canned stuff is runny and gross.


I had enough batter to also make cupcakes.


When I called her away from "The Nightmare Before Christmas" dvd to see the cake, ....


....this super-happy face made my day.


"It's a Hello Kitty Cake!" she squealed, followed immediately by "Can I eat her arm?!?!"

Wednesday, October 21, 2009

Happy Mole Day this Friday!

Happy Mole Day! (10/23)

What do you mean, you don't know what Mole Day is?!?! Don't worry. Until 2 days ago, I had no idea what it was either.

What is a Mole? Thanks to http://www.chemistry.co.nz/mole.htm, a Mole is:


the amount of pure substance containing the same number of chemical units as
there are atoms in exactly 12 grams of carbon-12 (i.e., 6.023 X 10 to the 23rd Power [I can't get the superscript to work on this post]). This involves the acceptance of two dictates -- the scale of atomic masses and the magnitude of the gram. Both have been established by international agreement. Formerly, the connotation of "mole" was "gram molecular weight." Current usage tends to apply the term "mole" to an amount containing Avogadro's number of whatever units are being considered. Thus, it is possible to have a mole of atoms, ions, radicals, electrons, or quanta. This usage makes unnecessary such terms as "gram-atom," "gram-formula weight," etc.


Since it is 10 to the 23rd power, 10^ 23, chemistry students celebrate "Mole Day" on October 23rd.


Jake asked if I could help him make a "Mole" cake for class on Thursday (as on Friday the 23rd, schools in our county are closed). Sure, why not. Sounds like a hoot!


Jake colors the gum paste grey.


The mole gets put on top of the hill.


Jake rolls out the leaves in the background while I cover the mole's opening with "dirt." (crushed Oreo's)


Jake works on piping some numbers in the cake and adds the leaves he cut to it as well.


Ta Da!!


Happy Mole Day!

Saturday, October 17, 2009

Mice in a Pumpkin

I decided to try a cake from one of my Debbie Brown instructional books. This one was a pair of mice inside a pumpkin.

I made my round ball cakes and scored them to get them to look like the grooves in the pumpkin.


I also made a small 8" cake with extra batter I had. I ices both the pumpkin cake and the 8" cake and then proceeded to color my Marshmallow Fondant.


The MMF was not cooperating. It was too sticky. I am not sure if I added too much water the day before when I made it, or if the kitchen was too hot. All I know is that the MMF was sticking to every surface and would not smooth out. UGH, talk about frustrating!!

The end job was cute enough and my co-workers enjoyed it.


Saturday, October 10, 2009

Into the Oven

No, I don't mean the website I shop at (which is a great place to shop for cake supplies). I mean, a turkey into the oven.

I wanted to practice some cakes for Thanksgiving. I want to make one for that day, so I decided to try one out. Over at Cake Central, do a search for "oven" and you'll see all the ones I based this cake on.


On the first night, I worked on the small items that I wanted inside the oven. I created a turkey, a roasting pan, potatoes, carrots and a sack of potatoes out of gum paste and left them out overnight to harden.


Cute!!!


The next night, I baked four 8x8 square cakes. Two chocolate and two almond butter. I also made cream cheese icing. I stored them overnight, so they would be completely cool before I carved and iced them.


I carved out a space for the interior of the oven. Difficult and messy.


I iced each later with the cream cheese icing, and re-stacked them. I then covered them with white fondant and began the hard task of getting the opening to look like an oven opening. It was a pain and I'm not 100% satisfied with what I did. (I know. When am I ever?)


My burners are wonky. :) But I do like my towel and oven mitt.
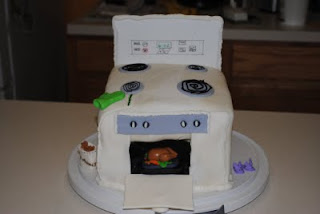


Here is the cake. The back board is just that; cardboard. Others who made this cake used Rice Krispee (sp?) Treats (also known as RKT in cake-people jargon) molded to look like the backdrop and covered with fondant. RKT is light and pliable enough to make many things, but not having puffed rice, or wanting to go to the store, I settled for cardboard. :)


I love my turkey though, and Isabel insisted on the bunny slippers. A couple of pictures on Cake Central included cook books on the oven and bunny slippers on the side. She saw them and was adamant I make them, so there they be. :)

Sunday, October 4, 2009

Frozen Buttercream Transfer

My teacher mentioned a process called Frozen Buttercream Transfer, where you take any picture you like, create it in buttercream on wax paper, freeze it, and then transfer it onto your cake. It's great when re-creating logos, popular cartoon characters, etc.

The trick to it, though, is to paint it in layers, with the "front" layer painted first and the background colors painted over those. Here's my first attempt.

I will warn you, it stunk. :) But practice makes perfect.


Find a picture you like and print it.


Place your picture under a bit of wax paper. Create the outline in black. with icing using a #1 or # 2 tip. Notice I also colored the bats in the moon as well.


Start filling in the smaller things, like the sun, the yellow windows and the purple detail on the roof.


I didn't get a picture of the next thing, which was, color in the main color, the black of the house. It does not matter if you get into any of the yellow, because the yellow is down on the paper first, up front. If back gets behind it, you won't see it, because the yellow is the front layer.


Once you're done, you can also add a smear of the icing that's on your cake. I figured later that this really was not needed, but every instructional I read said to.


Place your buttercream transfer in the freezer. Prepare your cake, making sure that the buttercream on the cake is firm and set. (mine was not).


After at least 15 minutes in the freezer (can make these days and days ahead of time), place the buttercream side of the wax paper down on your cake. Gently peel off the wax paper, rubbing it down if you need to loosen some of the buttercream off the wax paper.


Voila. Buttercream transfer. It's kind-of goopy, but I'm getting the idea.